
Philips Avent bottle warmers use gentle steam to heat milk and baby food quickly and evenly. Unlike microwaving, steam reduces hot spots and helps preserve nutrients. This guide walks you through every step—from setup to cleaning—so you can warm bottles fast, safely, and with less stress.
Quick summary (for skimmers)
- Prep bottle and water → add the correct water to the reservoir → insert bottle and select mode/time → start warming → swirl and test temperature → feed.
- Typical warming time: about 3–8 minutes depending on bottle size, milk temperature, and model.
- Clean and descale regularly to keep performance consistent.
How the Philips Avent bottle warmer works
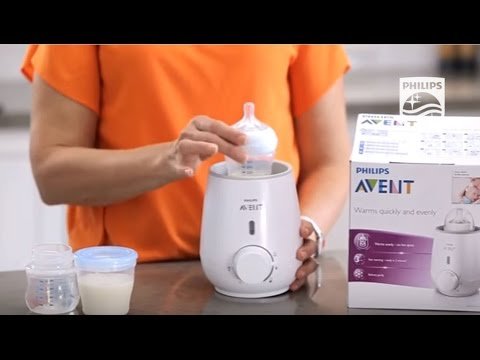
- Most Philips Avent warmers heat a small reservoir of water to create steam, which transfers heat evenly to the bottle or jar.
- Common parts: base, water reservoir/chamber, bottle holder or basket, and either a manual dial or digital controls with presets (bottle/food/frozen).
- Benefits: gentler heating than microwaves, reduced hot spots, consistent results for night feeds.
Step-by-step: using a Philips Avent bottle warmer
- Prepare the bottle
- Fill a clean bottle with breast milk or prepared formula. Close the nipple/lid for warming.
- If your tap water is very hard, use filtered or bottled water for the reservoir to reduce scale buildup.
- Add water to the reservoir
- Pour the water amount recommended by your unit’s manual or the markings on the warmer. Exact volume affects timing, so follow the chart in your manual.
- Don’t overfill or underfill.
- Insert the bottle and set controls
- Place the bottle upright in the holder or basket.
- Close the lid (if present).
- Select the warming time or mode (bottle/food/frozen) and press start.
- Warm and wait
- Let the unit finish its cycle. Avoid opening the lid mid-cycle to keep temperature stable.
- Typical cycles take 3–8 minutes, depending on model, bottle size and starting temperature.
- Swirl and test
- Remove the bottle, swirl gently to even temperature and avoid hot pockets.
- Test a few drops on the inside of your wrist—milk should feel warm, not hot—before feeding.
Simple warming-time guide (approximate)
- Small bottle (4 oz / 120 mL), room temperature: ~3–4 minutes
- Medium bottle (6–8 oz / 180–240 mL), chilled from fridge: ~4–6 minutes
- Large bottle (8–10 oz / 240–300 mL), fridge to warm: ~6–8 minutes
Note: Times vary by model and starting temperature. Always follow your manual and test temperature.
Best practices & safety checklist
- Always test milk on your wrist—not just by the unit light.
- Swirl the bottle after warming to even temperature and reduce hot spots.
- Use bottles that fit upright and sit securely in the holder to ensure consistent heating.
- Never heat milk or formula in a microwave—steam warming is safer.
- Unplug the unit after use and keep it out of reach of children.
- If baby refuses the bottle, wait a minute and re-check the temperature.
Cleaning & descaling (keep it working well)
- Daily: wipe exterior with a damp cloth; empty and rinse reservoir after a few uses.
- Monthly (or more often with hard water): descale the reservoir. Many manuals recommend running a descaling cycle with a white vinegar and water solution or a manufacturer‑approved descaler—check your manual for exact instructions.
- Do not immerse the base or plug in water. Always unplug before cleaning.
- If persistent odors occur after cleaning, contact Philips support.
Recommended descaling approach
- If manual allows: mix equal parts white vinegar and water, pour into reservoir, run a short cycle, then rinse thoroughly with clean water. If unsure, follow your model’s manual or the Philips support guidance.
Troubleshooting common issues
- Warmer won’t start: check power, plug, outlet, and fuse; ensure unit is on a flat, stable surface.
- Milk still cold after cycle: confirm correct water amount and bottle placement; try a slightly longer program per manual.
- Uneven warming: swirl bottle after warming; use bottles that fit the warmer’s holder.
- Strange noises or odor: descale and clean reservoir; if odor persists, contact support.
If problems continue, contact Philips/Avent support or your retailer for repair/replacement options.
Warming breast milk vs. formula
- Breast milk: warm gently and avoid overheating to help preserve immune and nutritional properties. Use shorter cycles and test more frequently.
- Formula: less heat‑sensitive but still avoid hot spots. Follow recommended water amounts and timing for consistent results.
Travel & portability tips
- For travel, consider compact Philips Avent models or portable bottle warmers.
- Carry a small measuring cup to pour the correct amount of water into the reservoir.
- If no power is available, pre-warm water in an insulated thermos to warm bottles manually or use a battery-operated warmer.
Accessories & extras to consider
- Spare Avent bottle(s) sized to your model
- Small funnel or measuring cup for adding reservoir water cleanly
- Travel pouch and a lightweight bottle brush for on-the-go cleaning
People also ask
Q: How long does a Philips Avent bottle warmer take?
A: About 3–8 minutes depending on bottle size, starting temperature and model. Use your manual’s timing chart and always test temperature.
Q: Can I warm baby food jars in this warmer?
A: Yes—many models have a baby food mode. Place jars upright and use any included basket or adapter.
Q: Is it safe to warm breast milk in a Philips Avent warmer?
A: Yes—when you follow the manual, use gentle cycles, and avoid overheating. Always swirl and test the milk before feeding.
Q: Do I need to add water every time?
A: Yes. The reservoir needs the correct water volume before each heating cycle to ensure proper warming and safety.
Q: How do I descale a Philips Avent bottle warmer?
A: Follow your manual. Many users run a short cycle with a vinegar-and-water solution (or a manufacturer-recommended descaler), then rinse thoroughly.
Conclusion
Mastering a Philips Avent bottle warmer is quick with a couple of practice cycles using water. Follow the step-by-step guide, test milk temperature every time, keep the unit clean and descaled, and you’ll get reliable, even warming for night and day feeds.